Base Gallery
User Guide & Documentation
User Guide & Documentation
Find out more about the base gallery, including live demos.
Buy the GalleryFully functional demo available (Limited to 6 images on export).
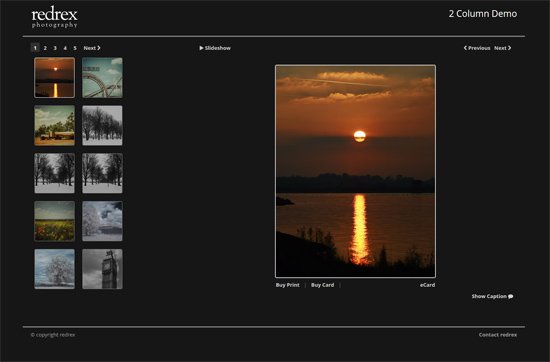
Base Gallery DemoVersion 1.7 of the Base Gallery works with Adobe Lightroom 3, 4 & 5 (use version 5 for lightroom 6/CC) on PC & Mac.
Browser Compatibility is listed below;
Getting started...
When you purchase the gallery from the website you should recieve an email with a download link to the gallery. If you do not recieve an email or have issues with the download (for instance, blocked by spam filter or your entered your email address incorrectly). You can log in to your account here and go to the file tab to download your purchase.
Once you have downloaded the gallery please unzip the file. Please see the instructions below on how to install the Lightroom gallery on either Windows or OS X. (The same instructions applies for installing the demo of the gallery.)
Locate the folder which has your version of Lightroom, LR3 or LR4+5 inside this folder copy the folder called
redrexBase.lrwebenginePaste the folder in to your Lightroom installation path
C:\Users\**YOUR_USERNAME**\AppData\Roaming\Adobe\Lightroom\Web Galleries
To update the base gallery please remove the redrexBase.lrwebengine folder from its installation path and place with the newer version. You will need to restart Lightroom to see any changes. Also update the template files with each update too.
To remove the demo of the base gallery delete the redrexBaseDemo.lrwebengine folder from the installation path. You will need to restart Lightroom to see any changes. Please note that the demo does not have to be uninstalled to use the full version.
In Lightroom on the Web section right click on the User Templates in the Template Browser panel. Then click import and select the template files from your download. Templates are now installed to use. For any update please delete the older web template versions and install the new ones in their place.
This section goes through each input field in the gallery settings panel.
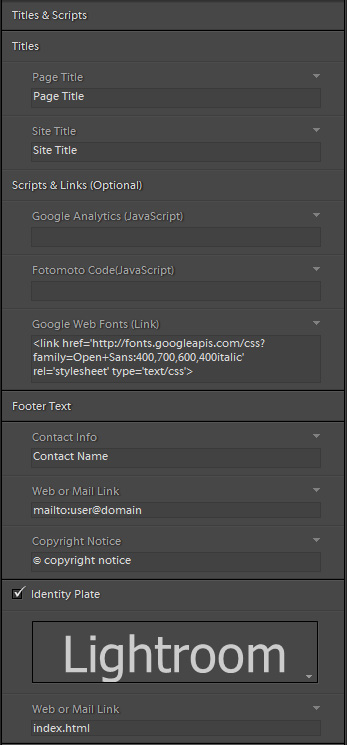
Shows in the browser header.
Gallery title which is displayed in the top right hand corner of the page.
All the fields in this section are optional features and are not required for the gallery to operate.
You can integrate Google Analytics tracking in to the gallery by adding your javascript tracking code in this field.
You can obtain the code by creating an account via this link http://www.google.com/analytics/.
Offers you the option of adding javascript tracking code from services such as Google analytics. Make sure you include the tags for the code.
An example of this code is shown below. Do not use this code it will not work as the UA number is not complete. Obtain your code from the Google analytics website.
<script type="text/javascript">
var _gaq = _gaq || [];
_gaq.push(['_setAccount', 'UA********
**'])
;
_gaq.push(['_trackPageview']);
(function() {
var ga = document.createElement('script'); ga.type = 'text/javascript'; ga.async = true;
ga.src = ('https:' == document.location.protocol ? 'https://ssl' : 'http://www') +
'.googleanalytics.
com/ga.js';
var s = document.getElementsByTagName('script')[0]; s.parentNode.insertBefore(ga, s);
})();
</script>
Fotomoto (Javascript)
You will require an account to get the required code. Please go to http://www.fotomoto.com and sign up for an account.
When you create a site you will be presented with a Store wizard (see below). On the screen make sure you select the following options under section 4 (Highlighted in red). Under the 'Your sites publish platform' choose the 'I have a custom made website' from the 'Publishing Platform' drop down. On the next drop down menu select 'Galleriffic' for the 'Do you use any libraries'. Now click finish.
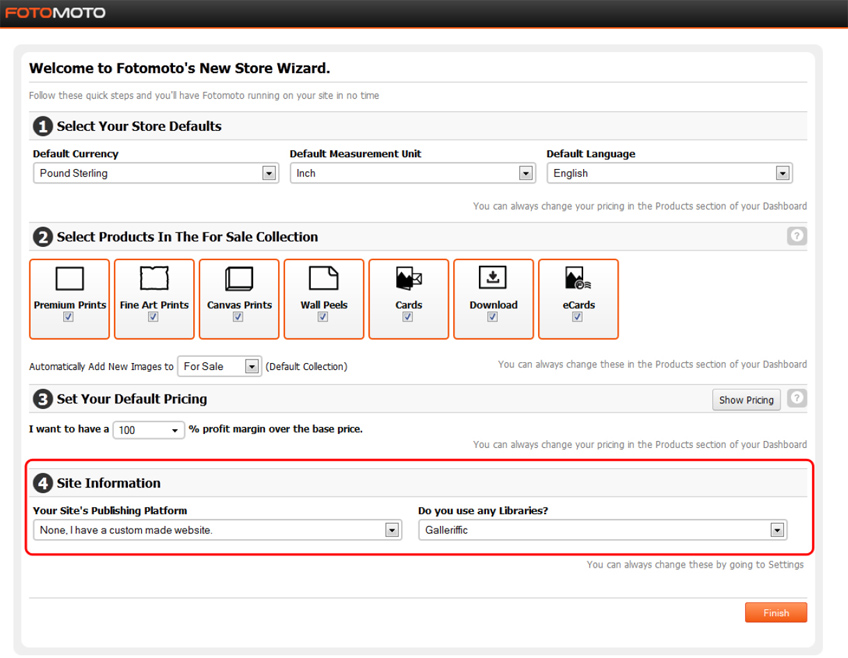
The next page will give you the javascript, copy and paste this code into the Fotomoto field in the Base Gallery in Lightroom.
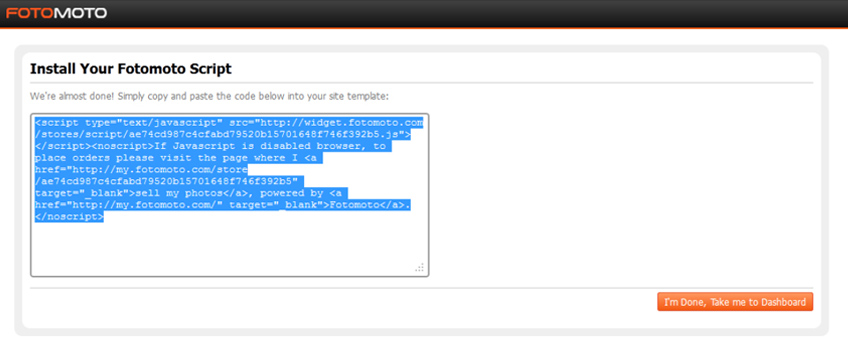
You can get this code later if you go to the settings page http://my.fotomoto.com/stores/settings.
The next step is to set up your fotomoto gallery how you like please go to http://support.fotomoto.com/customer/portal/articles/9897iveinstalledfotomotonowwhatfor help on what to do next.
You do not need to use fotomoto with the gallery. Its an optional feature.
Please check the following points below to help ensure fotomoto works correctly.
A Fotomoto demo is viewable here.
Here you can add fonts from the Google web font service https://www.google.com/fonts. They need to be added as a link tag similar to this.
<link href='http://fonts.googleapis.com/css?family=Kavoon' rel='stylesheet' type='text/css'>
'Kavoon', Arial, sansserif
Field allows you to enter text which is displayed at the bottom right of the page. This can be used with the next field to allow a web or mail link.
Gives you the option of entering your own copyright notice, which shows on the bottom left.
Add your Identity Plate to the top left corner of the page and set a Web or Mail link in the field below it.

In this panel you can change all of the gallery labels and link buttons. You can use Font Awesome icons to enhance the UI.
Example of implementing a font awsome icon.
<i class="fa fa-camera-retro fa-5x"></i>
View this link to see all the icons available.
Please ensure that you do not use HTML mark up in the Title Labels fields, as this will break the galleries code validation. Only use HTML in the Label fields.

In this section you can adjust the colours of the gallery.
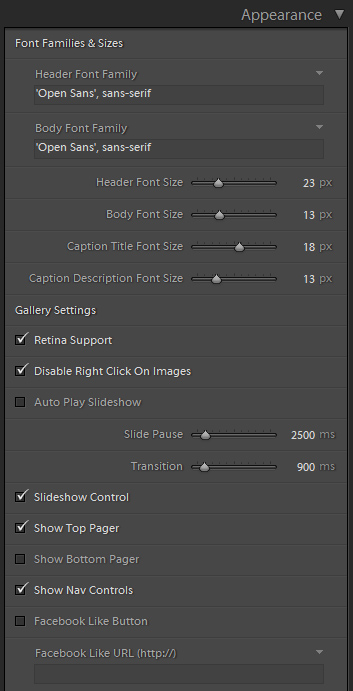
Here you need to add your font choice either from a web safe font or a Google web font. List your fonts in order preference and separate with a comma.
Various font sizes can be adjusted for the Header, Body, Caption Title & description.
This feature enables high resolution images to be created which will be displayed when viewed on high resolution devices such as the retina iPad or iPhone and Nexus 10 tablets. Please note that by enabling this that your gallery size will increase in terms of bandwidth required to view it. If you want mobile users to have a faster viewing experience then disable the feature, however to improve their viewing experience of the image please enable it.
By enabling this users will not be able to right click an image and "Save Image As/Copy" an Image.
This gallery shows this feature in action.
Starts slide show as soon as page is opened.
Time pause for each image in milliseconds.
Time its takes for image to appear.
Hide or show the slideshow controls bar.
Controls Thumbnail paging make sure a least one of these are checked if you have more images than the number of thumbs value.
Hide or show gallery nav controls.
Hide/Show button, please be aware this is only visible on a live web server.
redrex recommends www.1and1.co.uk for web hosting services.
The URL you would like your like to link to. Please make sure the URL starts with "http://"
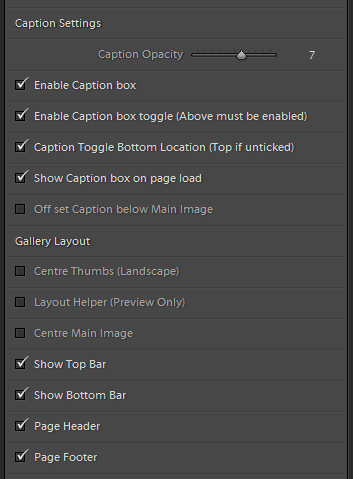
Sets the transparancy of the caption background.
Shows the caption box in the gallery.
Allows the user to show and hide the caption panel via click the toggle link. Make sure the checkbox is enabled above if you wish this to work correctly.
Sets the location of the toggle link. If unticked the link will show in the top position above the gallery.
Caption box will be displayed on initial view of the gallery.
When checked this will put the caption box below the main image. This makes the gallery operate similar to how it did before the 1.7 update.
This option is best for the landscape layout. It centres the thumbnails. Please note this option isn't supported in IE7 and will not show correctly in Lightroom 3 on Windows due to it using IE7 to preview.
Click this to help you in creating different layouts when editing the gallery sizes. Only shown in Lightroom.
Click this to centre the large main image in its panel, works best when the "Main image longest edge size" is set to 1280px.
Hide or show line bars.
Render the gallery header which contains the title and logo.
Render the gallery footer which contains the contact link and copyright details.
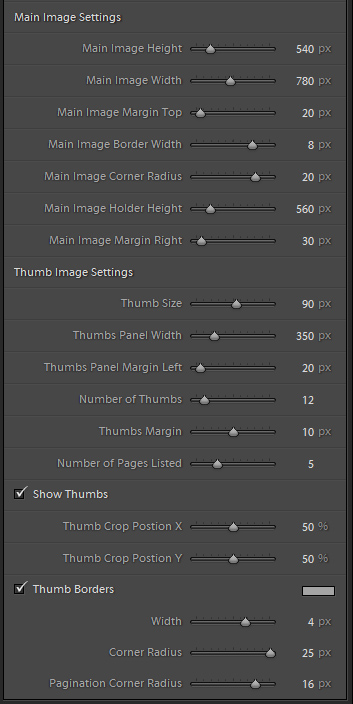
The largest value you would like your photos to have in either width or height. Please note that the size of your image may not match this for certain image ratios and if its in landscape or portrait orientation.
Sets a margin between the top slideshow bar and the main image.
Adjusts the border width for the main image.
Allows you to round the borders of the main image. Please note that this will not be visible in preview mode of Lightroom in Windows, due the IE 7/8 limitations. Example of rounded corners can be see here.
Adjust this to the maximum height of your photos, also leave a little extra if you are using fotomoto to fit in the links.
Margin right for the main image.
Size of the thumbnails. Between 50 and 100 pixels.
Width of the panel which contains the thumbnails.
Lets you adjust the left margin of the thumbs panel.
Amount of thumbs rendered in the gallery.
Margin adjustment on a thumbnail image.
Amount of pages listed in the pagination. To Learn more on how these gallery settings work try using the different templates included in the download and see how the settings work.
Enables the displaying of the thumbs.
Repositions the cropping of the thumb images in the x and y coordinates. Zero starts at the top left hand corner.
Allows you to enable borders for the thumbnails. Here you can also set the colour, width, corner radius and pagination corner radius.
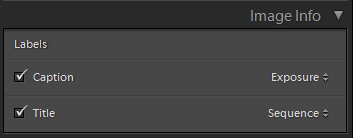
This section allows you to define what information is displayed in the caption section.
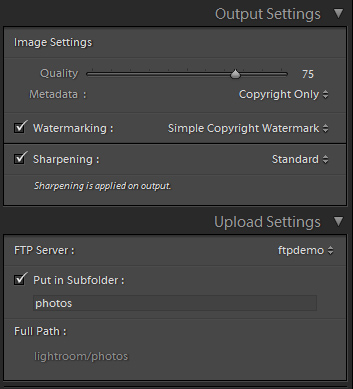
For the quality setting you may want to consider a balance between image size and quality. As this will improve load times of your gallery.
Lightroom uses Internet Explorer 8(IE8) browser to render its preview, if you change your default browser to another, for example Firefox, IE8 will still be used. Due to this HTML5 and CSS3 spec features will not render correctly as they are not featured in this browser, for example the rounded corners on the thumbnails and paging. If you click on "Export" or "Preview in Browser" and view your gallery in a modern browser (IE9+) then all features will be working. Mac users will not have this issue as the most recent version of safari browser is used by Lightroom to render its preview.
This issue occurs if you choose to watermark an image which has a large ratio difference such as 2500 x 500 pixels and you choose to have large index and gallery thumbnails. To solve this issue you can reduce the thumbnail size of both index and gallery thumbnails, normally anything below 170pxs will resolve it. Or another option is to export your images with the watermark from the library section and then reimport them and add them to your web gallery, this would enable you to have larger thumbnails. This issue is a limitation of Lightroom cropping the thumbnails, to make them square, which causes the crash and not a problem with the redrex base web gallery.
The Facebook like button will not be visible on the Lightroom preview or the local file view. To enable the button to display you need to have the gallery hosted on a live web server. redrex recommends www.1and1.co.uk for web hosting solutions.
If you encounter the gallery updating not working correctly make sure that Lightroom has finished creating the photos and make another edit to get the gallery to update correctly, this usually happens when making large galleries.
If you come across any issues while using the gallery please contact us at support@plugins.redrex.co.uk, please make sure that your issue is one of those stated in the Issues section above.
Upon purchase, free download or trial of a redrex Photography product you are granted a nontransferable license to use purchased or downloaded plugins, web galleries, develop presets and templates subject to the terms & restrictions stated below.
You are free to install and use redrex Photography plugins, web galleries, develop presets and templates on up to 2 computers owned by yourself. To install redrex Photography plugins, web galleries, develop presets and templates on a number of computers exceeding two, additional licenses are required to be purchased.
You are not licensed to reverseengineer, distribute, clone, copy, modify or alter in any way the licensed software without the specific approval of redrex Photography, or if written in product documentation, or in tutorials published by redrex Photography. jQuery and the Galleriffic plugin, are third party plugins and hold their MIT Licenses respectfully.
You are allowed to make your own alternations as desired to exported HTML pages, CSS stylesheets, JavaScript and image files only.
All exported galleries can be published on any domain owned by yourself. If you wish to publish galleries on domains not owned by yourself, a new purchase is required from the domain owner.
DISCLAIMER OF WARRANTIES: YOU AGREE THAT REDREX PHOTOGRAPHY HAS MADE NO EXPRESS WARRANTIES TO YOU REGARDING THE SOFTWARE AND THAT THE SOFTWARE IS BEING PROVIDED TO YOU "AS IS" WITHOUT WARRANTY OF ANY KIND. ADOBE DISCLAIMS ALL WARRANTIES WITH REGARD TO THE SOFTWARE; EXPRESS OR IMPLIED; INCLUDING; WITHOUT LIMITATION; ANY IMPLIED WARRANTIES OF FITNESS FOR A PARTICULAR PURPOSE; MERCHANTABILITY; MERCHANTABLE QUALITY OR NONINFRINGEMENT OF THIRD PARTY RIGHTS. LIMIT OF LIABILITY: IN NO EVENT WILL REDREX PHOTOGRAPHY BE LIABLE TO YOU FOR ANY LOSS OF USE; INTERRUPTION OF BUSINESS; OR ANY DIRECT; INDIRECT; SPECIAL; INCIDENTAL; OR CONSEQUENTIAL DAMAGES OF ANY KIND (INCLUDING LOST PROFITS) REGARDLESS OF THE FORM OF ACTION WHETHER IN CONTRACT; TORT (INCLUDING NEGLIGENCE); STRICT PRODUCT LIABILITY OR OTHERWISE; EVEN IF REDREX PHOTOGRAPHY HAS BEEN ADVISED OF THE POSSIBILITY OF SUCH DAMAGES.
All logos and trademarks are the property of the respective trademark owners.
Updated: 19/02/2014